Have you ever wondered how to create your own Google Chrome extension? Well, then you're lucky because in this article we will create a simple extension that allows you to clear your browser history with a single click!
An extension is made up of two main files:
manifest.json: This is where we define the basic information about our extensions such as name, version, and description. In this file, we also specify all the permissions that are required and the icons that should be used.
background.js: The different event handlers and main logic for our extension are written in this script.
Step 1
We start by creating a new folder where we will place all the files required for our extension. Then we create the main files manifest.json and background.js. We also need an icon that will be shown in the toolbar, it should have the following sizes:
- 128x128
- 48x48
- 32x32
- 16x16
Step 2
Now we are going to specify the information required for our extension in our manifest.json file.
{
  "name": "My Extension",
  "version": "0.0.1",
  "description": "This is a chrome extension that will delete your browsing history!",
  "permissions": ["browsingData"],
  "background": {
    "scripts": ["background.js"],
    "persistent": false
  },
  "browser_action": {
    "default_icon": {
      "16": "images/icon_16.png",
      "32": "images/icon_32.png",
      "48": "images/icon_48.png",
      "128": "images/icon_128.png"
    }
  },
  "manifest_version": 2
}
These are just some of all the fields available that we will be using, you can read more about it on the Chrome developer website.
We have to specify browsingHistory as permission since we want to modify the history data. We have also specified the different icons that should be used for the button in the toolbar.
Step 3
Now we want to load our extension so we can test it locally when developing.
Navigate to chrome://extensions and enable developer mode.

Then click on Load unpacked and select the folder containing the extension.

The extension should now be listed next to the other ones already installed.
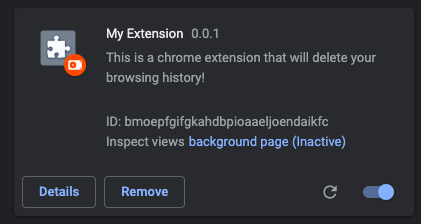
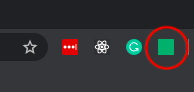
If you look in the toolbar you should also see the extension, using the icon that we provided.
Step 4
Now the fun begins, let's write the implementation of our Chrome Extension! In background.js we add a new event listener that will trigger when we click on the icon in the toolbar.
chrome.browserAction.onClicked.addListener(async () => {
  // Clear browser history.
});
Then we want to call the method that will clear the browsing history. We will clear all history but you could also specify start and end time and only delete the history in a specific timespan. You can read more about it in the browsingHistory documentation.
chrome.browserAction.onClicked.addListener(async () => {
  await chrome.browsingData.removeHistory({});
});
Now the logic for our extension is done, but wouldn't it be nice if we could give some visual feedback to the user that shows when the history has been cleared? Let's disable the extension icon in the toolbar and enable it once the history has been cleared.
chrome.browserAction.onClicked.addListener(async () => {
  chrome.browserAction.disable();

  await chrome.browsingData.removeHistory({});

  window.setTimeout(() => {
    chrome.browserAction.enable();
  }, 1000);
});
The reason for using window.setTimeout is to make it clear to the user that the history has been cleared even when the load time is very fast.

Congratulations! You have now created your first Google Chrome extension! Now you can take the next step and create something revolutionary!